Click on Route
| Principal Routes |
Return to the Top of East Slabs Route Descriptions
23a. Normal Route |
|
Class: 5.7 |
? hours |
First ascent: (?) | |
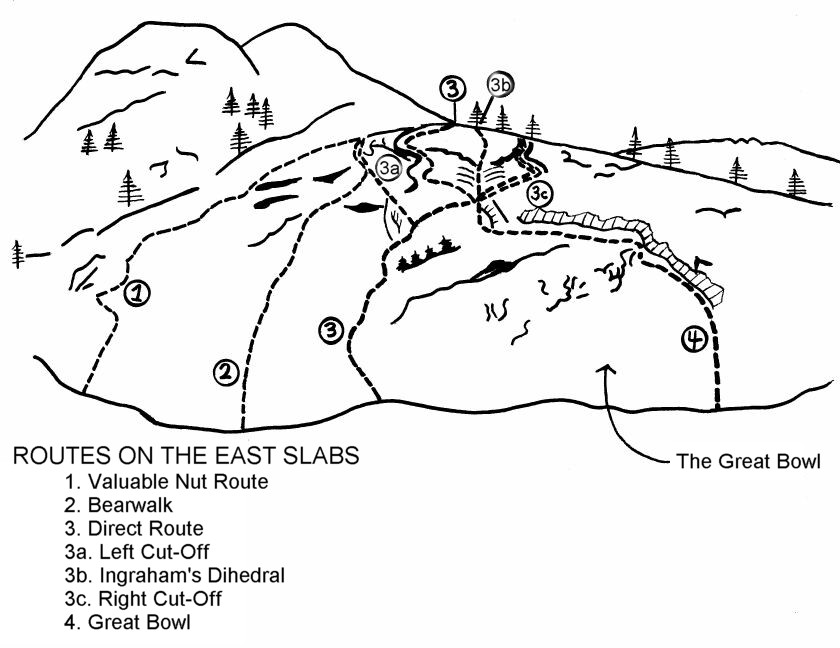
Begin the climb at the far left of the "Great Bowl". The belay is best made 10-15 feet off the ground as the crack here provides the best anchor. To start the slabs, proceed left from the crack by stepping up and out onto the face. The best holds lead slightly left. Locate the bolt before continuing. It is advisable to find the bolt before you start and to fix its position in your mind. This will make the next few moves much more enjoyable. The bolt is about 30 feet up and to the right in the black streak. The moves to the bolt are thin and once you have reached the bolt the hardest moves of the climb are probably over. This is the only protection available on the first pitch and its use is recommended. Proceed straight up until a large flake is reached. Belay here. It is not a full rope length. The second pitch is a full rope length. Go straight up following a shallow crack until you come to some broken ledges with a few small bushes. You should be on the lower ledge if you have a 150 foot rope. This is an intersection point. One hundred and fifty feet diagonally left is a bolt on the Cobblestone-Direct routes. One hundred thirty feet diagonally to the right is the base of Ingraham's Dihedral. This route continues straight up the cracks and ledges and is variable as to the number of pitches and belays required. Basically, you will first encounter an open book-dihedral structure facing this time to the north. Once you are in this crack follow it to the top. One pitch from the top you should belay from a large prominent tree (1 ft. diameter). The last pitch can be straight up the crack (trivial) or you can make a 25-30 foot traverse to a flake system on the left (enjoyable). The top of the slabs are obvious.
Return to the Top of East Slabs Route Descriptions
Variation -- Left Cut-Off |
From atop the first dihedral on the Normal Route. proceed left instead of right and head towards the crack and belay point at the end of the 5th pitch of the Bearwalk. Equipment needed: one 250 foot rope (minimum) and great faith in the almighty Gerch. No protection.
-- Chris O'Brien
-- Reed Cundiff
Return to the Top of East Slabs Route Descriptions
Variation -- Ingraham's Dihedral |
From the end of the second pitch, head 180 feet diagonally to the right until you are in a very noticeable "gully" (a feature which can be seen from White Sands Proving Ground). Head straight up it to a bolt. Then work straight up for another pitch to the end of the extreme friction slabs (about 5.9).
-- Chris O'Brien
-- Reed Cundiff
Return to the Top of East Slabs Route Descriptions
Variation -- Right Cut-Off |
c. At the bottom of the dihedral work diagonally to the right up to a small tree, which is about a rope length. Belay from the tree. Then head diagonally to the left so that you're above the dihedral (Ingraham's Dihedral) to your left. Protection is quite good for about half the lead and then quite disappears for the next 80 feet or so, which is fairly interesting. This lead winds up near the head of the Dihedral at a small pocket (a little smaller than basketball sized) which is filled with quartz crystals - very pretty. Belay stance protection isn't terribly hot - perhaps should put in a bolt since the first time required jamming a hammer in edgewise, tying in and hoping for the best. The next lead angles off to the right to another small tree, and then scampers to the top.
-- Chris O'Brien
-- Reed Cundiff
Return to the Top of East Slabs Route Descriptions
23e. Bearwalk 5.7 |
Rating this 5.7 may seem a bit high since it is difficult only for the first 30 feet or so getting off the ground - but even this requires a bit of swanning about to find a least difficult path. A fall would find one sliding the pitch length into the pine needles at the bottom. Start the climb 50 yards south of the Standard Route at the very lowest portion of the Slabs. Belay from one of the 2 ft. diameter trees. Begin at the bottom of a 10 foot wide black streak. It seems best to work up to the right as the holds to the left seem to exist primarily in the imagination. Now go straight up and then left to a small ledge with 2 bolts for a belay (150 foot total). The only protection that can be put in is about 80 feet up which is a medium chock. The second pitch is about 170 feet long, alas, (this brings about interesting problems in the last five feet - the second might just tie on several long slings to stretch out the rope). Go straight up from the ledge to an eventually noticeable large pocket (15 feet wide and 8 feet deep or so). A bolt has been placed at 120 feet for protection or if one is using an 150 foot rope, belay from this first bolt and make this lead into two leads. There is a bolt at the pocket for the belay although if one does the lead in two sections, one can place a bomb-proof nut at the top of the pocket. From the pocket go straight up about 140 feet to a bolt belay with knobs for the stance. The bolts can be found on this route by the red sling hanging from them. The fourth pitch goes straight up again. This pitch goes over a fairly steep section, after which, look for a quite good vertical crack to belay from. The fifth pitch is now straight up 120 feet to another bolt for the belay, at which point we have just about joined the Direct Route. The next three pitches are straight up. The sixth pitch has a protection bolt on it and requires a bit of fossicking about to work past one section but one can find jolly cobblestones for each move. Hardware needed: stubby and standard angles, short angles, short thick arrows, and jam nuts.
--Paul Seibert
Return to the Top of East Slabs Route Descriptions
23f. The Great Bowl Route 5.5 |
This is a most enjoyable climb, quite suitable for beginners although the exposure may throw them off a bit. The start of the climb is at the north (right) end of the "great bowl" and goes up the south facing dihedral which is perhaps the most prominent feature on the entire slabs. The zeroth pitch bush-whacks 40 feet or so up to the actual start of the climb. One can either belay tied into the bush or into excellent jam-nuttable cracks. The first pitch goes straight up the dihedral for about 100 feet until it starts to look hairy (the crack splits at about this point). There is now an inviting left diagonaling ledge which one is invited to take. About 20 feet out is a good belay stance with noticeable pin scars for the belay pins (3/4" to 1 1/4" angles). The lead itself can be very well protected by various sized nuts, a large channel nut is perfect about half way up. The second lead now goes a few feet to the left and then diagonals to the right under the left side of the bowl until you reach the apex of the bowl. Good pins can be put in as well as hanging slings around bollards. The move at the top looks hard but is quite easy and can be protected by placing a sling over the horn. Swing up to the left and look for a belay stance. There are several quite good ones horizontally to the left. The third pitch now goes almost horizontally to the left and does not go over the long overhang above (unless one does a variant in that direction). Lead out a rope length and belay from under the overhang with nuts or angles. Now either go further left and then up or go straight up from this point. The end of this fourth lead has now placed you at the bottom of Ingraham's Dihedral and one has the several options open: go up the Dihedral, go right up variant, or go diagonally left to the right facing dihedral. This last is by far the easiest being perhaps 5.1 or 5.0 while the other two are 5.6 to 5.9.
Hardware required: 1/2, 3/4, 1, 1 1/4, and 1 1/2 inch angles and a good selection of nuts up to and including one large channel nut.
--Reed Cundiff